原文: https://acassis.wordpress.com/2016/06/12/running-nuttx-on-a-less-than-u2-00-board/
几个月前我发现了一款便宜的微控制器 - STM32F103C8T6
我从AliExpress上购买仅花了1.96美元
收到货之后, 我实现了在板子上运行Nuttx, 并且向Mr. Greg(译者注: 应为Nuttx主要开发人员)提交了补丁,使Nuttx主线版本支持该板子
所以现在,任何人都能轻而易举地在STM32F103C8T6上运行Nuttx了
该教程将展示我是如何做到的,首先列出我们需要的物件:
- STM32F103C8T6 最小开发板
- STLinkV2下载器
- 支持3.3V电压的USB-串口转换器
- USB-MicroUSB数据线, 也就是平时给智能手机充电的那种
- 运行Ubuntu/Debian Linux的电脑, 应该也能用Windows(Cygwin)或MacOS, 但我没试过
第一步安装编译工具
1) 安装交叉编译包
1
| $ sudo aptitude install gcc-arm-none-eabi ncurses-dev gperf flex bison libtool
|
2) 编译安装OpenOCD
1 2 3 4
| $ git clone http://repo.or.cz/r/openocd.git $ cd openocd $ ./bootstrap $ ./configure --enable-internal-jimtcl --enable-maintainer-mode --disable-werror --disable-shared --enable-stlink --enable-jlink --enable-rlink --enable-vsllink --enable-ti-icdi --enable-remote-bitbang
|
完成后你将看到如下信息
1 2 3 4 5 6 7 8 9 10 11 12 13 14 15 16 17 18 19 20 21 22 23 24 25
| libjaylink configuration summary: - Package version ................ 0.1.0 - Library version ................ 0:0:0 - Installation prefix ............ /usr/local - Building on .................... x86_64-pc-linux-gnu - Building for ................... x86_64-pc-linux-gnu OpenOCD configuration summary -------------------------------------------------- MPSSE mode of FTDI based devices yes (auto) Segger J-Link JTAG Programmer yes ST-Link JTAG Programmer yes TI ICDI JTAG Programmer yes Keil ULINK JTAG Programmer yes (auto) Altera USB-Blaster II Compatible yes (auto) Versaloon-Link JTAG Programmer yes OSBDM (JTAG only) Programmer yes (auto) eStick/opendous JTAG Programmer yes (auto) Andes JTAG Programmer yes (auto) USBProg JTAG Programmer yes (auto) Raisonance RLink JTAG Programmer yes Olimex ARM-JTAG-EW Programmer yes (auto) CMSIS-DAP Compliant Debugger yes (auto)
|
编译并安装
1 2
| $ make $ sudo make install
|
下一步将下载编译Nuttx
1) 下载Nuttx核心和附带程序
1 2 3 4 5
| $ mkdir NuttX $ cd NuttX $ git clone https://bitbucket.org/nuttx/nuttx $ git clone https://bitbucket.org/nuttx/apps $ git clone https://bitbucket.org/nuttx/tools
|
2) 编译Kconfig Frontend(编译NuttX需要它):
1 2 3 4
| cd tools/kconfig-frontends ./configure --enable-mconf make make install
|
3) 为开发板编译NuttX:
1 2 3 4 5
| $ cd ../.. $ cd nuttx/tools $ ./configure.sh stm32f103-minimum/nsh $ cd .. $ make menuconfig
|
如果报错 kconfig-mconf: error while loading shared libraries: libkconfig-parser-3.12.0.so: cannot open shared object file: No such file or directory
请把 /usr/local/lib 追加到 /etc/ld.so.conf文件
进入 “Build Setup” 菜单并且确认”Build Host Platform”定义为”Linux”
进入 “System Type” -> “Toolchain Selection” 确认值为 (X) Generic GNU EABI toolchain under Linux
选择EXIT并保存
现在可以编译了
编译完成将打印
1 2 3 4
| make[2]: Leaving directory '/tmp/NuttX/nuttx/configs/stm32f103-minimum/src' LD: nuttx make[1]: Leaving directory '/tmp/NuttX/nuttx/arch/arm/src' CP: nuttx.bin
|
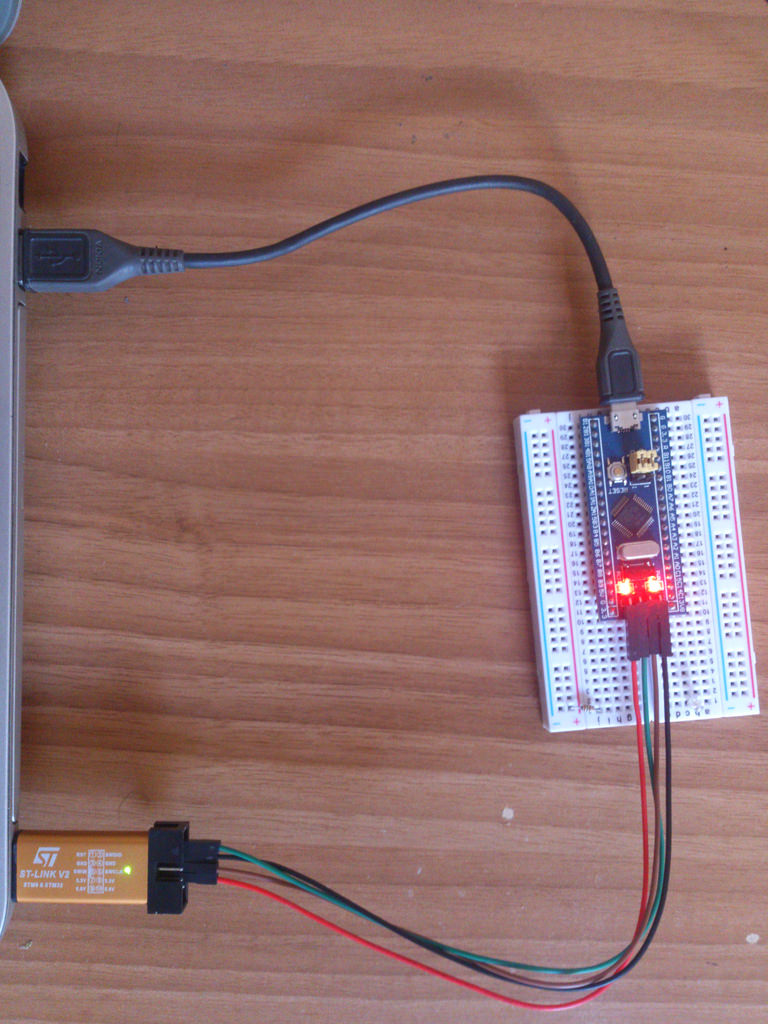
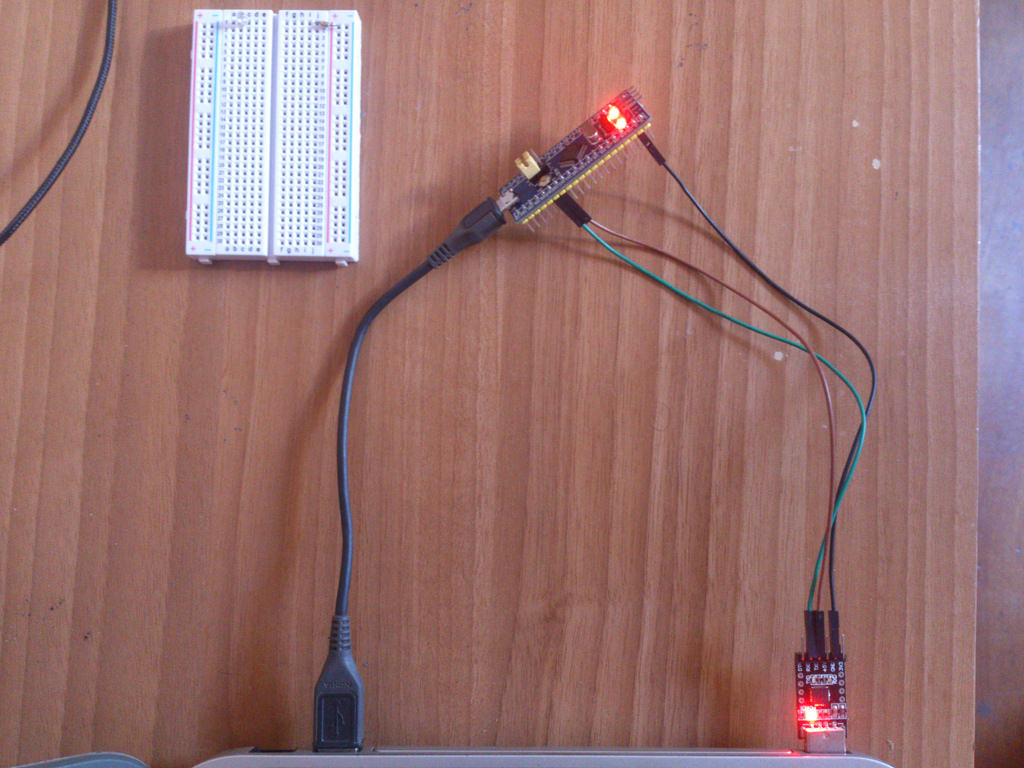
往开发板烧写nuttx.bin
如图所示, 将数据线和下载器连接到开发板上
创建如下内容的配置文件openocd_stm32f1.cfg
1 2 3 4 5 6 7 8 9
| # Using stlink as SWD programmer source [find interface/stlink-v2.cfg] # SWD as transport transport select hla_swd # Use STM32F103 target set WORKAREASIZE 0x4000 source [find target/stm32f1x.cfg]
|
执行OpenOCD
1 2 3 4 5 6 7 8 9 10 11 12 13 14
| $ sudo openocd -f openocd_stm32f1.cfg Open On-Chip Debugger 0.10.0-dev-00300-g89bf96f-dirty (2016-05-20-17:42) Licensed under GNU GPL v2 adapter speed: 1000 kHz adapter_nsrst_delay: 100 none separate Info : Unable to match requested speed 1000 kHz, using 950 kHz Info : Unable to match requested speed 1000 kHz, using 950 kHz Info : clock speed 950 kHz Info : STLINK v2 JTAG v17 API v2 SWIM v4 VID 0x0483 PID 0x3748 Info : using stlink api v2 Info : Target voltage: 3.297181 Info : stm32f1x.cpu: hardware has 6 breakpoints, 4 watchpoints
|
在新的终端窗口执行
1 2 3 4 5 6 7 8 9 10 11 12 13 14 15 16 17 18 19 20 21 22 23 24 25
| $ telnet 127.0.0.1 4444 Trying 127.0.0.1... Connected to 127.0.0.1. Escape character is '^]'. Open On-Chip Debugger > > reset halt stm32f1x.cpu: target state: halted target halted due to debug-request, current mode: Thread xPSR: 0x01000000 pc: 0x080003ac msp: 0x20000730 > flash write_image erase nuttx.bin 0x08000000 auto erase enabled device id = 0x20036410 ignoring flash probed value, using configured bank size flash size = 128kbytes stm32f1x.cpu: target state: halted target halted due to breakpoint, current mode: Thread xPSR: 0x61000000 pc: 0x2000003a msp: 0x20000730 wrote 40960 bytes from file nuttx.bin in 2.384699s (16.774 KiB/s) >
|
最后,通过USB-串口连接开发板
1 2 3 4 5 6 7
| ------------------------------- |USB/Serial | STM32F103 Board | ------------------------------- | RXD | A9 | | TXD | A10 | | GND | G | -------------------------------
|
用minicom/picocom连接/dev/ttyUSBx以获取Nuttx终端, 连接参数为”115200 8n1 “
当按下开发板上重置按钮后,将获得nuttx终端